Artwork Requirements for Plastic Card Printing
Table of Contents []
- Artwork Requirements for Plastic Card Printing - Plastic Card ID
- File Format and Resolution: The Foundation of Every Card
- Color Mode and Color Accuracy for Plastic Card Printing
- Bleed, Safe Zone, and Card Dimensions Explained
- Typography, Logos, and Special Encoding Zones
- Common Artwork Mistakes and How to Avoid Them
- Working With Plastic Card ID From File to Finished Card
Artwork Requirements for Plastic Card Printing - Plastic Card ID
Getting your artwork right before sending files to print is one of those things that separates a smooth, fast card order from a frustrating cycle of revisions and delays. Whether you're producing 500 employee badges or 20,000 loyalty cards, the file you submit determines the card your customers hold. Bad artwork equals bad cards - and nobody wants to discover that after 10,000 units have rolled off the press.
At Plastic Card ID, we've processed artwork from first-time buyers and seasoned marketing teams alike. After 25 years and more than 50 million cards shipped, we've seen every file format, every resolution mistake, and every color mode confusion imaginable. This guide breaks down exactly what we need - and why - so your next order moves from approval to doorstep without a hitch.
| Spec Category | Requirement | Why It Matters |
|---|---|---|
| File Format | PDF, AI, EPS, PSD, TIFF | Ensures print-ready fidelity |
| Resolution | 300 DPI minimum at final size | Prevents blurry or pixelated output |
| Color Mode | CMYK (not RGB) | Matches physical printing process |
| Card Dimensions | 3.375" x 2.125" (CR80) | ISO 7810 standard card size |
| Bleed | 1/8" (0.125") on all sides | Prevents white edges after cutting |
| Safe Zone | 1/8" inside trim line | Keeps text and logos from being cut |
| Fonts | Outlined or embedded | Prevents font substitution errors |
File Format and Resolution: The Foundation of Every Card
 Think of your artwork file as the blueprint for the physical card. If the blueprint has errors, the finished product reflects those errors - at scale, in plastic, permanently. File format and resolution are the two variables that cause the most preventable reprints in the industry, and both are completely within your control before you ever upload a file.
The CR80 card - the standard credit-card-sized format at 3.375" x 2.125" - is what most programs run on. That's the ISO 7810 standard, and it's the size your wallet, badge holders, and card printers are all built around. When you design at this size, you design with precision. Oversized canvases scaled down to card size almost always carry resolution artifacts that look fine on screen and terrible in print.
Accepted File Formats and When to Use Each
PDF is the universal favorite for a reason - it preserves layers, embedded fonts, and color profiles in a single portable package. Adobe Illustrator (.AI) and Encapsulated PostScript (.EPS) files are vector-based, meaning logos and text scale infinitely without losing sharpness. If your artwork was built in Illustrator, always save as .AI or .EPS with fonts outlined.
Photoshop (.PSD) and TIFF files work well for photo-heavy designs, but they must be set at 300 DPI or higher at the card's actual final size - not the document size before scaling. A 72 DPI TIFF at 8" x 5" will print at approximately 170 DPI at card size - far too soft for readable text or clean logo edges.
Avoid submitting Word documents, PowerPoint slides, JPEG screenshots, or files exported from Canva's free plan. These introduce compression, font substitution, and RGB color modes that require correction before press - adding time to your order.
Resolution Explained Simply
Resolution measures how many dots of ink the printer lays down per inch. At 300 DPI, a printed card looks sharp to the eye. Below 200 DPI, text softens, photo gradients become grainy, and fine-line logos develop jagged edges. Always build your artwork canvas at 300 DPI from the beginning - upscaling a low-res file afterward does not recover detail.
One exception: vector artwork. Files created in Illustrator using vector paths - shapes, text converted to outlines, drawn logos - are resolution-independent. They will print sharp at any size. If your card design is entirely vector, resolution as a metric doesn't apply in the same way. When in doubt, call our team at 800.835.7919 and we'll walk you through what your specific file needs.
Why JPEGs Are Risky for Card Artwork
JPEG compression was designed for web photos, not press-ready artwork. Every time a JPEG is saved, it discards image data to reduce file size - and that data is gone permanently. Files that have been saved and re-saved as JPEGs develop visible artifacts, especially around high-contrast edges like black text on white backgrounds or logo outlines.
If your only available file is a JPEG, it can sometimes work - but it needs to be a high-quality original export at 300 DPI, not a screenshot or a downloaded web image. When we receive a JPEG that won't print cleanly, we'll flag it before production begins rather than let a bad card ship to you.
Color Mode and Color Accuracy for Plastic Card Printing
Here is something that surprises designers new to print: the colors on your screen are not the colors that will print on your card. Monitors emit light using the RGB color model - Red, Green, Blue - combining those channels to produce every hue you see. Commercial printing, including plastic card printing, uses CMYK - Cyan, Magenta, Yellow, Black - physically layering inks. The gamuts don't match perfectly, and some RGB colors - vivid electric blues, saturated greens, certain oranges - simply cannot be reproduced in CMYK.
CPE converts RGB files to CMYK before printing, but automatic conversion can shift colors in ways that surprise clients. A logo that reads as a bold cobalt blue in RGB might convert to a noticeably purple-blue in CMYK. Submit files in CMYK from the start and what you proof is what you print.
Setting Up CMYK Correctly in Design Software
In Adobe Illustrator, create new documents with the Color Mode set to CMYK. In Photoshop, go to Image - Mode - CMYK Color before beginning your design. InDesign users should set the document color mode to CMYK and assign the correct output profile when exporting to PDF. These are one-click adjustments that prevent color surprises on the final card.
If you are matching a brand color, use the CMYK breakdown from your brand guidelines. If your brand guidelines only list a Pantone (PMS) color, ask your designer or use a Pantone-to-CMYK bridge chart to convert. PMS spot colors are typically outside what standard CMYK card printing can reproduce exactly, so a close CMYK approximation is the practical path forward.
Black Text and Rich Black Backgrounds
Small text on a card should always be set in pure black: CMYK values of 0C, 0M, 0Y, 100K. Using a "rich black" mix (such as 60C, 40M, 40Y, 100K) on fine text causes slight misregistration between ink layers, blurring the edges of small type. It might be invisible on a billboard - on a card at 8-point font, it looks slightly soft or shadowed.
For large black backgrounds or full-bleed dark areas, rich black is appropriate and will look deeper and more saturated than flat black. Use 60C, 40M, 40Y, 100K for big bold backgrounds, and 0C, 0M, 0Y, 100K for all body text under 14 points. This one rule resolves a significant percentage of text legibility complaints before they happen.
Proofing Your Colors Before Submitting
Soft proofing in Adobe software lets you simulate how CMYK output will look on screen. Go to View - Proof Setup - Working CMYK to activate it. It's imperfect but useful for catching major color shifts before submission. A physical proof printed on the actual card substrate is the gold standard for color-critical projects like loyalty cards, gift cards, or branded membership cards where color consistency matters deeply.
For high-volume orders or programs where brand accuracy is non-negotiable, request a physical proof before approving the full run. Yes, it adds a day or two. Yes, it is absolutely worth it when you are ordering 10,000 cards with your logo on every single one.
| Color Scenario | Recommended CMYK Setup |
|---|---|
| Small body text (under 14pt) | 0C 0M 0Y 100K |
| Full-bleed black background | 60C 40M 40Y 100K |
| Brand color match | Use CMYK from brand guidelines or PMS bridge |
| White elements on dark card | 0C 0M 0Y 0K (true white, no ink) |
Bleed, Safe Zone, and Card Dimensions Explained
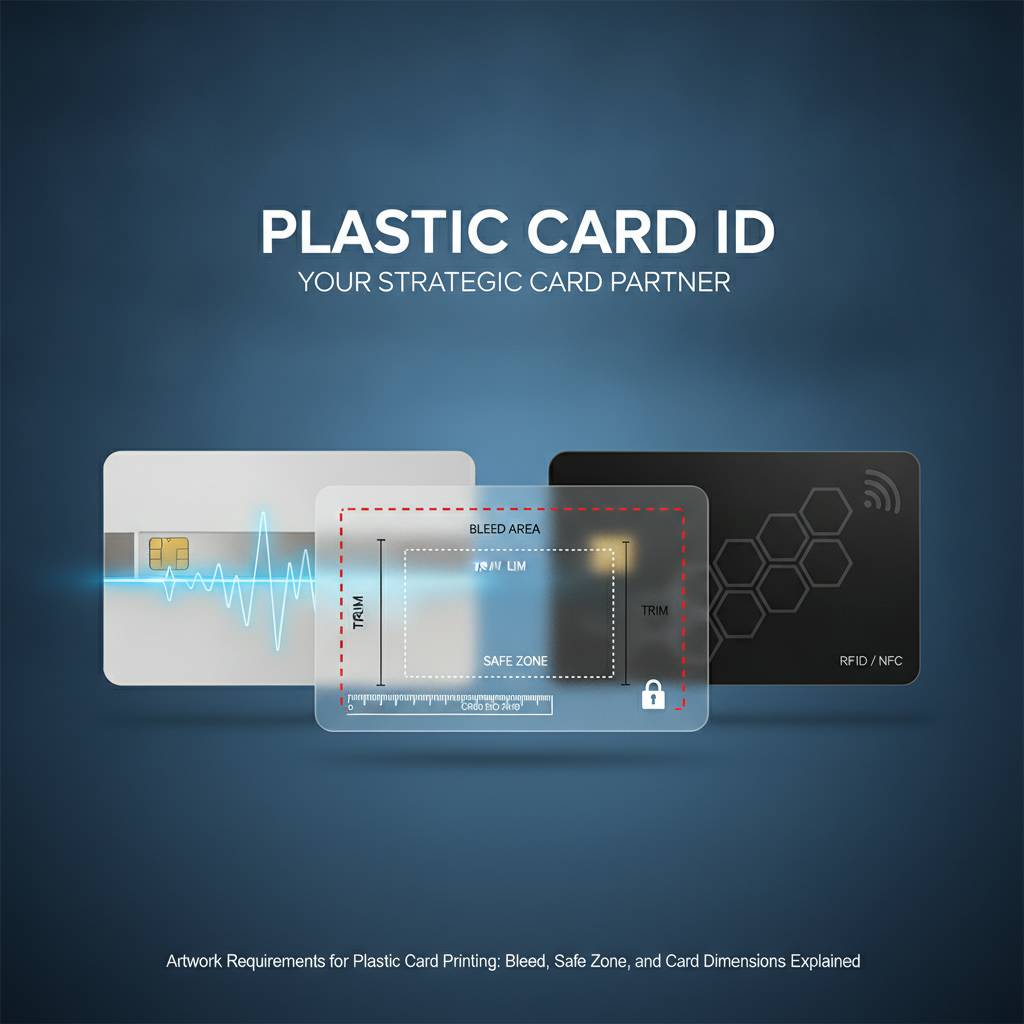 Cards are printed on sheets and then cut to size. The cutting process - while precise - has a tiny margin of variance, typically around 1/16". Without bleed built into your artwork, that variance shows up as a thin white edge along one or more sides of your card. Bleed is not optional on full-bleed card designs - it is the difference between a professional card and a noticeably off card.
The standard CR80 card measures 3.375" x 2.125" at 30 mil thickness. Your artwork canvas should be set to 3.625" x 2.375" to include 1/8" of bleed on all four sides. Any background color, gradient, or image that extends to the card edge must extend into this bleed area so the cut lands cleanly inside your artwork rather than at its edge.
Understanding the Safe Zone
The safe zone is the inverse of the bleed - it's the area you keep your important content inside. Set a safety margin of at least 1/8" from the finished card edge inward. No text, no logos, no barcodes, no critical design elements should live inside that margin. Everything that must survive the cut needs to live in the safe zone.
This matters most for membership cards with member names, loyalty cards with punch fields, and employee badges with ID numbers. Place those elements comfortably centered, well within the safe zone, and the cut won't threaten them. Many designers who are new to card printing place text flush to the edge of the card template - and then watch the final card clip part of the text when it is cut.
Designing for Special Card Formats
Not all card programs run on standard CR80 dimensions. CPE also supplies specialty options including custom die-cut shapes - rounded cards, key tags, mini cards, and more - each requiring its own bleed and safe zone setup specific to the cut path. When ordering die-cut cards, always request the cutting template before beginning design so your artwork aligns with the actual finished shape.
Clear and frosted plastic cards present additional considerations. Transparent card stock shows both sides of the print, so design elements on the front that overlay clear areas will be visible from the back. Plan your design with the substrate in mind - dark opaque design panels can anchor your primary artwork while the clear zones create visual depth that standard white cards cannot replicate.
Typography, Logos, and Special Encoding Zones
The smallest card in a wallet carries a surprising amount of information - name, number, barcode, logo, tagline, contact info. Fitting all of it legibly onto a 3.375" x 2.125" surface requires deliberate typographic decisions. Cards are not business cards, and they are not flyers. Every element on a plastic card must earn its space.
Minimum readable font size for body text on a card is 6-7 points, but 8-9 points is more comfortable for most readers. Anything smaller risks becoming illegible after printing, especially in light-colored fonts on light backgrounds. High-contrast text - white on dark, black on white - is almost always the right choice for maximum legibility at small sizes.
Outlining Fonts Before Submission
Fonts are software - they live on your computer, not in your artwork file unless you embed or outline them. When a file arrives without embedded fonts, our prepress software substitutes a default font, which can reflow text, change spacing, or entirely alter the look of your card. Outline all fonts before saving your final print-ready file and this problem disappears entirely.
In Adobe Illustrator: Select All text, then Type - Create Outlines. In InDesign: Export as PDF with "Subset Fonts Below 100%" checked in the PDF export settings. In Photoshop: fonts are already rasterized at export, so no additional action is needed. Make this part of your pre-submission checklist and you will never receive a font substitution correction notice from our team.
Logo Quality and Vector Formats
Logos submitted as low-resolution PNGs or JPEGs are among the most common artwork issues we encounter. A logo that looks clean at thumbnail size on a website is typically 72-96 DPI - a third of what print needs. Always request your logo in vector format (.AI, .EPS, or .SVG) from your designer or brand team.
If a vector version does not exist, a high-resolution PNG at 300 DPI or higher at the actual size it will appear on the card is the acceptable fallback. Scale the logo to card size first, then check the resolution. If it's soft at 100% zoom in your design software, it will print soft on the card. Our team will flag this before production - but catching it yourself saves time on both ends.
Magnetic Stripe, Chip, and RFID Artwork Clearance Zones
Cards with magnetic stripes, smart chips, or RFID antennas have physical components embedded in the card that affect where you can place printed elements. Magnetic stripe cards require a clear zone along the stripe itself - typically the top 3/8" on the back of the card. Do not place printed text or critical design elements over the magnetic stripe area as the stripe must remain clean for encoding and reading.
Smart chip cards have a gold contact pad embedded in the front surface - usually positioned in the upper-left quadrant following ISO standards. Your front artwork must account for this pad's location, leaving the area clear or designing around it intentionally. RFID and proximity cards often have internal antennas that are invisible from the outside, but HF and UHF cards may have specific printing constraints - ask our team at 800.835.7919 when placing orders for encoded cards so we can confirm clearance requirements before you finalize artwork.
Common Artwork Mistakes and How to Avoid Them
We've reviewed hundreds of thousands of card files over the years. The mistakes are remarkably consistent - not because designers lack skill, but because plastic card printing has specific technical requirements that differ from web design, social media graphics, and even standard commercial print. Knowing the most common mistakes in advance is the fastest way to avoid them.
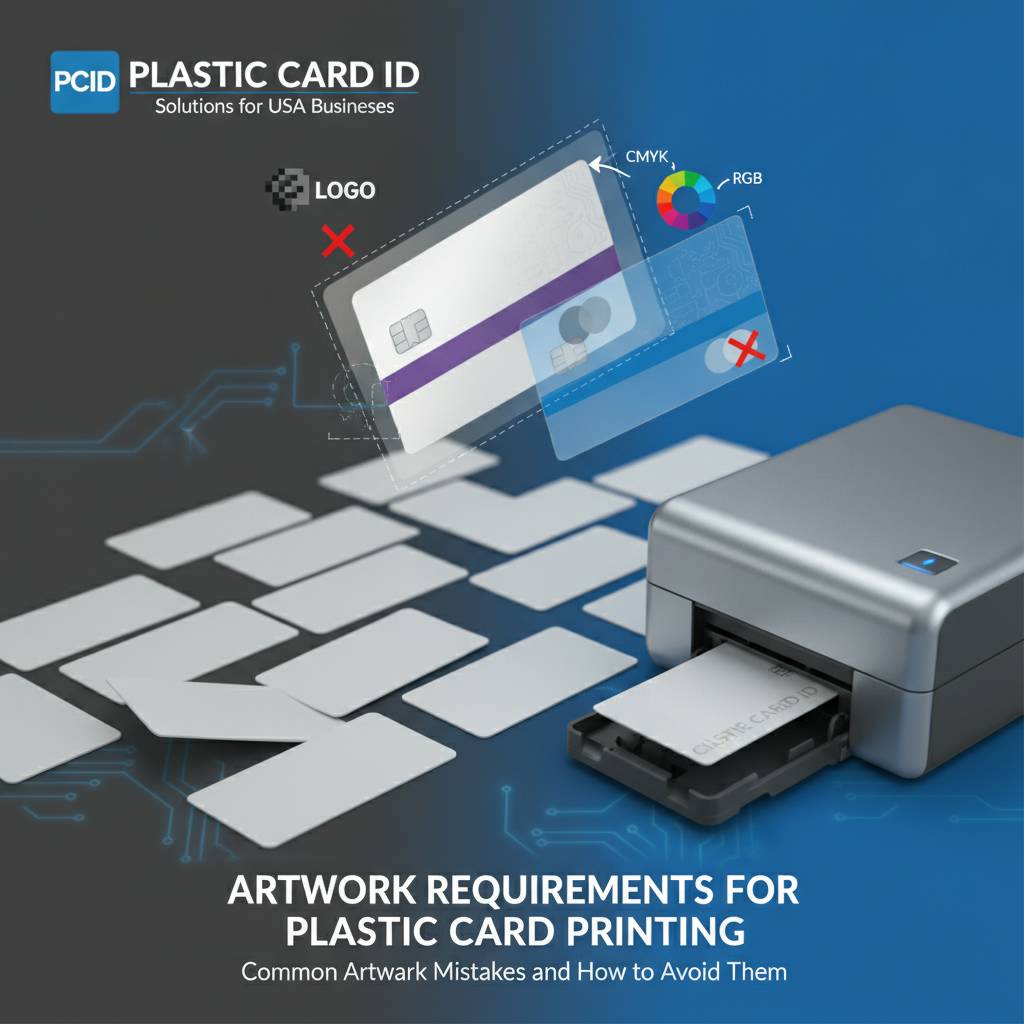
Below is a practical breakdown of the errors we see most often, along with the fixes that keep orders on schedule.
Top Artwork Errors That Delay Card Orders
- RGB color mode instead of CMYK - Colors shift on conversion, sometimes dramatically for brand colors.
- Resolution below 300 DPI - Text and logos print soft or pixelated, especially at small sizes.
- No bleed on full-bleed designs - White edges appear along one or more sides after cutting.
- Fonts not outlined or embedded - Font substitution alters text layout and appearance.
- Critical content outside the safe zone - Text or logos get clipped during cutting.
- Using a screen-resolution logo - Low-DPI logos print blurry even when the rest of the file is correct.
- Designing at the wrong card size - Cards designed at business card size or rounded dimensions don't align with CR80 specs.
- Rich black on small text - Causes visible blur or color fringing on fine type.
Each of these issues is 100% fixable before submission. Run through this list as a checklist before uploading your file and you will sidestep the most common reasons for artwork revision requests. Our prepress team reviews every file before it goes to press - we will catch issues before they print - but catching them before submission keeps your order moving without delays.
Artwork Tips for First-Time Card Buyers
If you are designing a plastic card for the first time, start by downloading a card template from our site. Our templates are set up at the correct size with bleed and safe zone guides already in place - you design inside the template rather than trying to remember all the measurements. Templates eliminate dimension and bleed errors entirely because the structure is pre-built.
Keep your design simple. A card is small. Designs that try to include every possible piece of information - taglines, social media handles, website, phone, address, member number, expiration date, QR code, and a full-color photo - compete for attention and result in a cluttered card that is hard to read. Great card design prioritizes hierarchy: your logo leads, key information follows, secondary details sit quietly at the bottom.
In-House Printing vs. Custom-Printed Cards
Some programs benefit from CPE's in-house printing option using desktop card printers from Evolis, Zebra, or Fargo. With a blank PVC CR80 card and a card printer, your team can print cards on demand - personalizing each card with names, photos, ID numbers, and barcodes without placing a bulk order. In-house printing gives you total control over card personalization at a lower per-run cost for programs that constantly add new members, employees, or guests.
Custom-printed cards ordered through Plastic Card ID are the better choice for programs that need consistent, high-quality branded cards at volume - loyalty programs, gift card programs, event credentials, and membership cards where brand presentation matters and personalization happens at point of issue. Both paths use the same CR80 card format and many of the same artwork principles - the difference is who runs the printer.
Working With Plastic Card ID From File to Finished Card
Submitting artwork to Plastic Card ID is designed to be straightforward. Upload your file, our prepress team reviews it, and we confirm it is press-ready before production begins. If we spot an issue - resolution, color mode, a missing bleed - we contact you before printing rather than producing a card that doesn't match your intent. We treat every order as if our name is on the card too, because our reputation is built one order at a time across more than 100,000 clients nationwide.
From blank CR80 cards to fully custom-printed loyalty programs, magnetic stripe hotel keys, RFID access cards, and casino player cards, the card you need is in our catalog. Retailers who switch from paper to plastic gift cards consistently see sales increases of 35-50% - the card that lives in a wallet gets used again. That kind of result starts with a card that looks and feels right. And a card that looks and feels right starts with artwork prepared correctly.
Our Prepress Review Process
Every file submitted to Plastic Card ID goes through a prepress check before it is queued for production. Our team reviews resolution, color mode, bleed, safe zone compliance, font embedding, and encoding zone clearances for specialty cards. If anything needs correction, you hear from us - not from a card that shipped wrong.
Turnaround on prepress review is typically fast. For orders where artwork is submitted clean and ready to print, production moves immediately. For orders where corrections are needed, we communicate clearly about what needs to change and why so your team can resolve it quickly and confidently. We have helped clients who submitted a JPEG screenshot and walked them through producing a proper print-ready file the same day. We are not here to reject artwork - we are here to get your card printed right.
Design Support and Templates
Don't have an in-house designer? CPE can help. We offer card templates for standard CR80 cards, magnetic stripe cards, smart chip cards, and specialty formats that take the guesswork out of file setup. Download the template for your card type, open it in your preferred design software, and design within the guides. Templates are the fastest path from idea to approved artwork for organizations without dedicated graphic design resources.
For clients who need design assistance beyond templates, we can discuss options during your consultation. Reach our team directly at 800.835.7919 to talk through your card program, get template links for your specific card type, and confirm any encoding or specialty requirements before your designer begins work.
From 50 Cards to 50,000 - Same Standards Apply
Whether your program issues 50 membership cards a month or runs a mass production order of 50,000 loyalty cards, the artwork requirements are identical. Resolution, color mode, bleed, safe zones, outlined fonts - these are not just large-order considerations. A 50-card order with bad artwork produces 50 bad cards just as reliably as a 50,000-card order with bad artwork produces 50,000 bad ones.
The good news is that getting artwork right is a one-time learning curve. Once your template is set up correctly, your color profile is saved, your fonts are outlined, and your logos are vector - you can reuse and update that file for future orders with minimal effort. The first order is the hardest. Every order after that benefits from the work you did the first time.
Ready to get your card order started the right way? Contact Plastic Card ID today at 800.835.7919 and let our team guide you from artwork to finished card - on time, on spec, and built to last.
Previous Page